
Edit a form
Precondition
Make sure you
- are logged in.
- know how to save changes.
Editing or adding a form
The most important thing with forms is testing. Once you created a form, test it! Always! Can you submit it? Did you receive the emails configured? Are the placeholders in the email correctly replaced?
To add or edit a form go to forms then click Add New or hover over the form you want to edit and click Edit.
To get started, it might be the easiest to make a copy of an existing form and play with it.
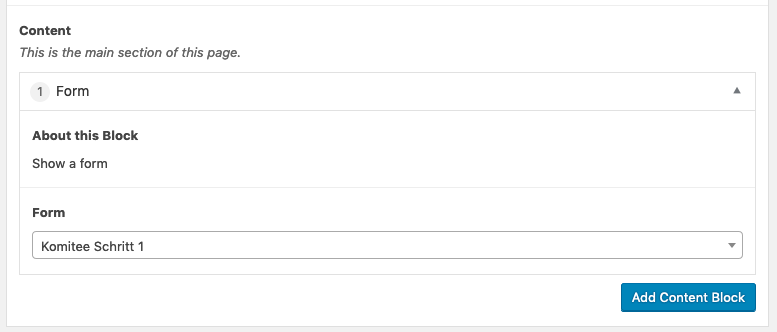
Adding a form to a post or page
Forms are always part of a post or a page. If you want to have a form visible, you have to create a post or page and add it to this post or page. To do so, use a Form content block on the correspondig page or post and select the form that should be displayed.
Form details
Add fields using the Add field button. You may reorder them by grabbing them on their number on the right hand side and dragging them on the position of desire.
Form fields
Every input field of a form consists of a form field of a certain type. Here is how they look on the frontend:
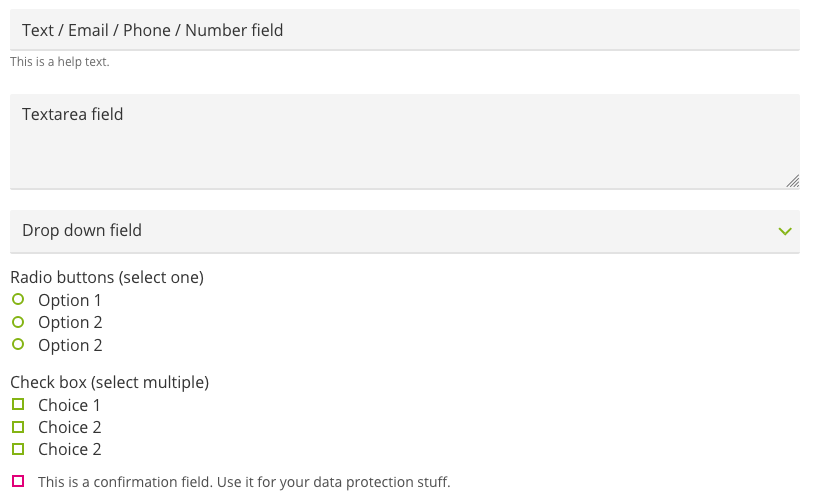
The Text, Email, Phone and Number field are only distinguished by their accepted values. A text field will accept any value, an email field accepts only input that looks like a valid email address. So does the phone field for phone numbers. The number field only accepts integers.
If you provide a help text, it is displayed below the corresponding field.
Submit
Use the Button field to define the text on the submit button. The Button Submitting field defines the text that is shown while submitting the form.
The Description field can be used to provide some additional info next to the submit button.
After Submit
You can simply show the visitor a message after he has submitted the form (Show message (inline)) or you can redirect him to a dedicated page (redirect to post / page).
Mails
Confirmation
Activate the confirmation to send the visitor an email, after he has completed a form.
For this to work, the form must have exactly one field of type email.
You can use the {{placeholders}} in the email template (body) and the subject field to personalise the email.
Be aware, that the placeholder depend on the field label and therefore will change, if you change the field label.
Notification
You can specify an email address that will be notified for every form submitted. Usually you may want to configure this.
If you have a form that expects many submission, like a petition, you can also disable the notification. The submissions will always be available in the backend (see submissions).
Sender Settings
To reduce the probability your form submission emails will be marked as spam, the sender address is fixed to website@yourdomain.com. However you can specify a nice name, that will be displayed to the user instead to the email address.
For the receivers to be able to respond, you must add the Reply-to email address. Usually this is your own email address.
Submissions
All form submissions are stored on the website.
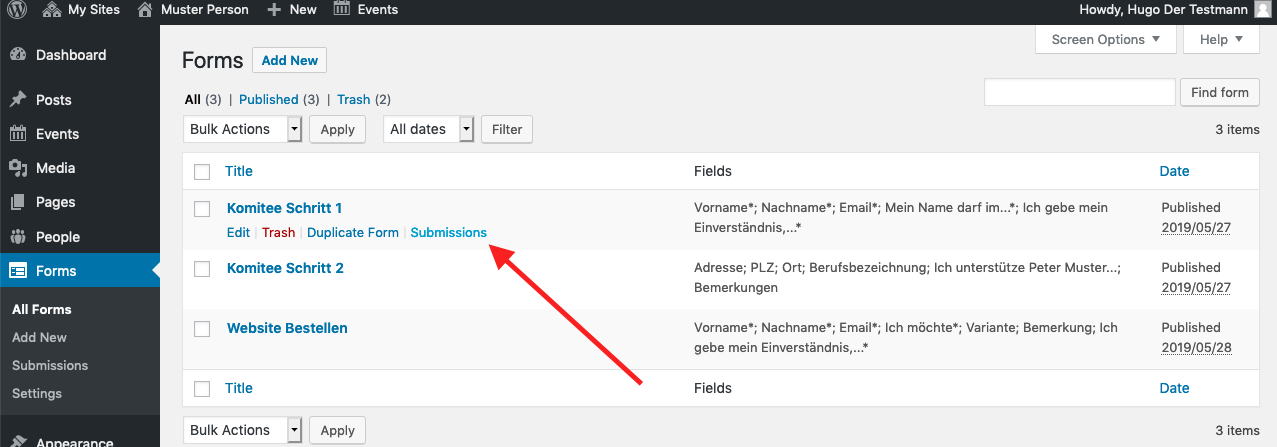
Note also the Export .xlsx button on the bottom of the submissions page.